
When troubleshooting your computer, the appearance of the DRAM light on your motherboard can be a daunting issue. This indicator often signals memory-related problems, which can prevent your system from booting up properly. Whether you’re building a new PC or facing unexpected errors on an existing system, understanding what the DRAM light means and how to resolve the issue is crucial.
In this article, we’ll delve into what the DRAM light on your motherboard indicates, explore its common causes, and provide actionable solutions to help you get your system up and running.
What Is the DRAM Light on a Motherboard?
Most modern motherboards feature diagnostic LEDs that help users identify hardware issues during the boot process. These lights are typically labelled as CPU, DRAM, VGA, and BOOT. The DRAM light specifically indicates a problem with your system’s memory (RAM).
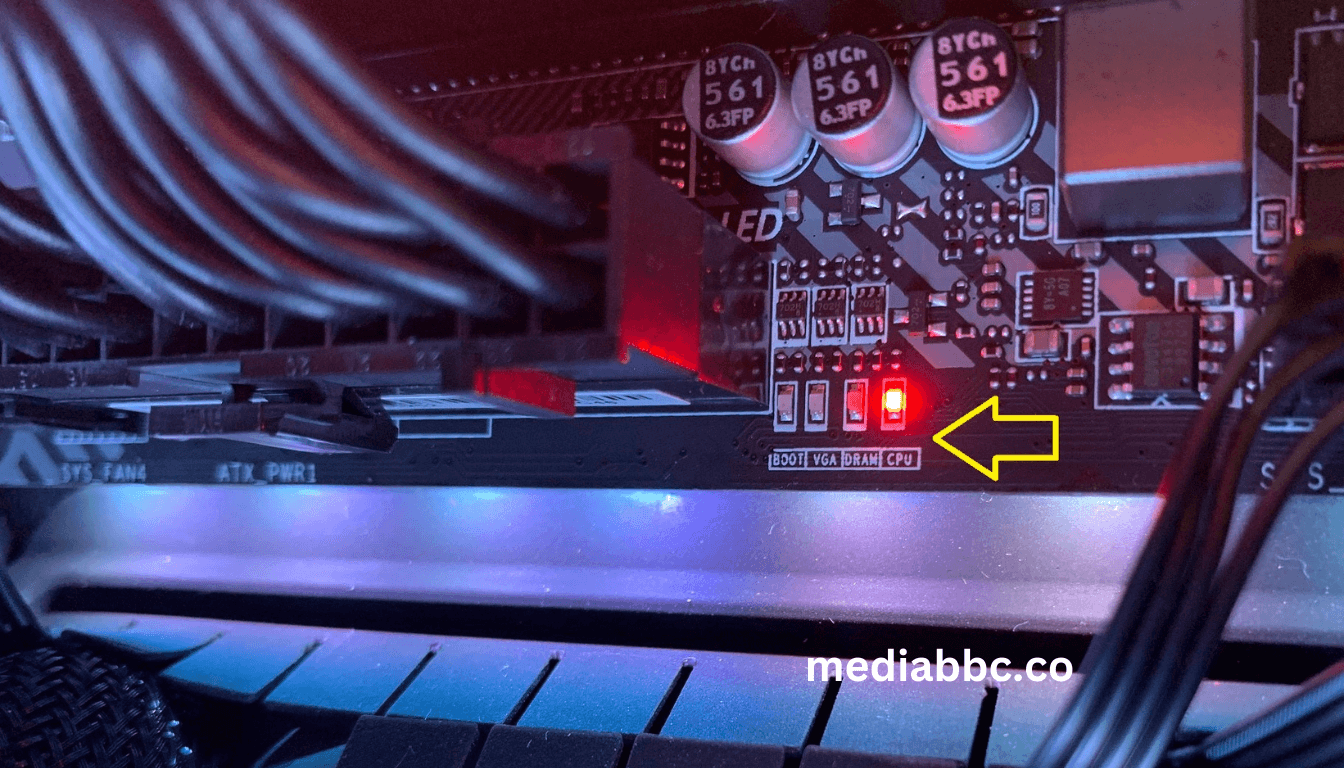
When the DRAM light is illuminated, it means the motherboard has encountered an error during the memory initialization phase. This could result from improper installation, hardware compatibility issues, or faulty components. Resolving this issue is essential for achieving a successful boot.
Common Causes of the DRAM Light
The DRAM light can turn on for a variety of reasons. Here are some of the most common causes:
- Improper RAM Installation
- RAM modules may need to be seated properly in their slots.
- The modules might be installed in the wrong DIMM slots, according to the motherboard’s manual.
- Incompatible RAM Modules
- The RAM might not be compatible with your motherboard.
- Mismatched RAM sticks or unsupported frequencies can also trigger the DRAM light.
- Faulty RAM Modules
- One or more RAM sticks might be defective.
- BIOS Settings or Firmware Issues
- Outdated or incorrect BIOS configurations can cause memory errors.
- Motherboard or CPU Issues
- Faulty DIMM slots on the motherboard.
- Problems with the CPU’s memory controller.
- Electrical or Power Supply Problems
- Insufficient power delivery to the motherboard or memory modules.
Diagnosing the DRAM Light Issue
Before diving into solutions, it’s essential to diagnose the root cause of the problem. Here’s a step-by-step process to identify the issue:
Step 1: Power Off and Inspect
- Please turn off your PC and unplug it from the power source.
- Open the case and visually inspect the RAM modules and their slots.
Step 2: Check RAM Placement
- Ensure the RAM sticks are fully seated and locked into place.
- Refer to your motherboard manual to confirm the correct DIMM slots are being used.
Step 3: Test Individual RAM Sticks
- Remove all RAM sticks and test them one at a time in different slots.
- This can help identify if a particular stick or slot is faulty.
Step 4: Reset the BIOS
- Resetting the BIOS to default settings can clear any memory-related configuration errors.
- This can be done by removing the CMOS battery or using the motherboard’s BIOS reset jumper.
Step 5: Inspect the Motherboard and CPU
- Check for visible damage to the motherboard or CPU socket.
- Ensure the CPU is installed correctly, as its pins or pads play a role in memory communication.
Solutions for Resolving the DRAM Light Issue
Once you’ve identified the likely cause, it’s time to apply the appropriate solution. Below are detailed fixes for each scenario:
- Reinstall the RAM Modules
- Remove the RAM sticks and reinsert them firmly into their slots until you hear a click.
- Follow your motherboard’s dual-channel configuration guide for optimal placement.
- Upgrade or Replace the RAM
- Verify that your RAM modules are compatible with your motherboard’s specifications.
- If you suspect a faulty RAM stick, replace it with a new one and test again.
- Update the BIOS
- Check the motherboard manufacturer’s website for the latest BIOS version.
- Follow their instructions carefully to update the firmware.
- Clean the RAM Slots and Modules
- Use compressed air to remove dust and debris from the RAM slots.
- Clean the gold connectors on the RAM sticks with a soft eraser or alcohol wipe.
- Test Another Power Supply Unit (PSU)
- If you suspect power delivery issues, try using a different PSU with adequate wattage.
- Seek Professional Help
- If none of the above solutions work, consider consulting a professional technician.
Preventing Future DRAM Light Issues
To minimize the risk of encountering DRAM light problems in the future, follow these best practices:
Use Compatible Components
- Always check the motherboard’s QVL (Qualified Vendor List) for supported RAM models and configurations.
Handle Components with Care
- Avoid touching the gold connectors on RAM sticks.
- Ensure all components are installed securely without forcing them.
Keep the System Clean
- Regularly clean your PC to prevent dust buildup that could interfere with connections.
Update Firmware and Drivers
- Keep your motherboard’s BIOS and other drivers up-to-date to ensure compatibility with new hardware.
Final Thoughts
The DRAM light on your motherboard can be an intimidating sight, but with the right approach, it’s usually a solvable problem. By understanding the potential causes and applying systematic troubleshooting steps, you can resolve the issue and get back to enjoying your PC.
Remember to consult your motherboard’s manual and manufacturer’s support resources for additional guidance. With a bit of patience and attention to detail, you can tackle the DRAM light challenge and ensure your system runs smoothly.
Visit our other blog post: The Razer Blade 15 2018 h2: A Comprehensive Review